Thursday, October 28, 2021

Recirculating Hoods and Indoor Air Quality

A few years ago, Fine Homebuilding published a very energy efficient house that had a recirculating range hood. The reason for the recirculating hood was to avoid punching an additional […]

The post Recirculating Hoods and Indoor Air Quality appeared first on Fine Homebuilding.

Wednesday, October 27, 2021

Pressure Washer Dangers – Serious Damage

Pressure Washer Limestone Damage

Pressure Washer Dangers | A pressure washer caused this irreparable damage to dense hard limestone. The operator used it to remove spray paint protesting the governor of Puerto Rico but now has permanently etched the slogan into the stone surface. Copyright 2021 Tim Carter

Pressure Washer Dangers are Real - Be Super Careful

Do you own a pressure washer? I’ve had no less than five of them in my lifetime. I must say they’re amazing machines when you use them correctly and on surfaces that won’t be harmed by the powerful blast exiting the nozzle at the end of the cleaning wand. If you want to know how to use a pressure washer, I can help you.

Damage Proof is at the Grand Canyon

My college degree is in geology. A month after my 20th birthday, I found myself walking down the Kaibab Trail into the maw of the Grand Canyon on my first out-West geology field trip. It took about four or five hours to get down to the Colorado River.

I don’t know if the professor told us at the time, but the National Park Service says the Colorado River gobbled up all that missing rock transporting it to the ocean in just 6,000,000 years. It did this with just 14.2 pounds of normal atmospheric pressure pushing down on the water flowing over the rock, not 2,400 pounds as many pressure washers produce.

In other words, water just normally flowing over dense hard rock will erode it. Think of how much destructive force is created when you plug in your pressure washer or pull the start cord on its gasoline engine. I witnessed an agonizing example of this destructive force on a trip to Old San Juan, Puerto Rico in October of 2019. Months before anti-government protestors had spray-painted slogans on many of the buildings.

Pressure Washer Etches Solid Limestone

The governor dispatched workers to remove the paint and they decided to use a pressure washer. One of the buildings was built using hard oolitic limestone. The operator of the machine removed the paint, but he also eroded the actual stone permanently etching into the building facade that had been spray painted. It was hard to stomach because one would think within a few minutes the operator could see he was damaging the stone itself.

Pressure Washers Damage Wood Decks

Think of the things around your home that are far softer than hard limestone the likes of which many of the buildings in Washington DC are made, including the Washington Monument! That oolitic limestone was chosen for a reason because it’s so long-lasting and it’s gorgeous.

Pressure Washer Limestone Damage

In other words, if you don’t know how to use a pressure washer and aim that cleaning wand at your wood deck, your wood deck railing, or the wood steps, in a matter of seconds you’ll transform smooth treated lumber into a weathered fishing pier where the soft springwood in between the darker bands of summerwood has been worn away.

Cleaning Concrete Pavers - Easy to RUIN THEM

Do you use your pressure washer to clean your brick paver driveway, sidewalk, or patio? I’m talking about the interlocking bricks made from concrete that have dry pigments added to them. These brick can be had in an assortment of earthy colors and tones.

pressure washer cleaning brick patio

That color you see at the surface is just an ultra-thin coating of cement paste that has the dry pigments in it. It’s child’s play for your pressure washer to blast away this thin film of color exposing the actual color of the small stones used to make the concrete brick. Put the spray wand too close to the brick and you’ll actually blast away some of the small fine sand used to make the brick.

Pro Pressure Washers Make Serious Mistakes

I see professionals improperly use pressure washers all the time. Many are painters who use them to wash the outside of a house before applying a fresh coat of paint. All too often I see the operator aiming the cleaning wand up to clean things above his head or shoulders. This is a huge mistake.

Aim Wand DOWN

We builders construct homes thinking about how rain falls. Rain falls down, and in rare instances, it can hit a structure sideways during a powerful storm, nor’easter, or hurricane. But Mother Nature rarely has rain blowing up to the sky.

Builders lap siding, trim, flashings, etc. so that the falling water doesn’t get behind the outer skin of your house. An operator aiming a pressure washer up can drive water behind the outer skin of your home in short order. Never ever aim a pressure washer wand up on the outside of your home.

Cleaning Vinyl Siding With Pressure Washers

Is your house covered with vinyl siding? Have you ever paid attention to how the pieces of siding overlap at a joint along a long wall? Don’t ever aim a pressure washer wand so the water lifts the overlapping siding and gets behind the vinyl. The same is true for where the vinyl trim is up against windows and doors. There’s a seam there and the pressure washer can drive lots of water behind the siding that otherwise shouldn’t be going there.

First and foremost you should read cover to cover any manual that comes with your pressure washer. The manufacturer may have all sorts of warnings about how to use the machine with different materials.

At the very least, use your own critical-thinking skills. Do experiments. Instead of aiming the pressure wand at a 90-degree angle to the surface you’re cleaning, try 45 degrees or even 10 degrees! If you’re using a high-pressure stream of water to remove flaking paint, it’s best to hold the wand almost parallel with the painted surface. The stream of water will burrow between the paint and the surface and blast it away usually doing little harm to the siding or trim.

Column 1421

The post Pressure Washer Dangers – Serious Damage appeared first on Ask the Builder.

Concrete Rust Remover – Special Acid – How to Prevent Rust

rusty concrete steps

Concrete Rust Remover | What a sad situation to see rust stains on these concrete steps! The rust could have been prevented with a small amount of paint and a few extra minutes. Copyright 2021 Tim Carter

Concrete Rust Remover - Special Acid Just Below

You may be like me and notice things about who knows what. For example, you may pay attention to decorating things and color coordination. Or, you may focus on landscaping and outdoor furniture arrangements. The list of things to look at in and around homes is almost endless. My eye is attracted to any and all defects that I see. It almost ranks as a disease because instead of enjoying looking at a home, I tend to feel like I’m inspecting it.

Recently, I had to travel from my home in central New Hampshire to Cincinnati, Ohio. Cincinnati is my hometown and in some ways, it was great to be back. But I quickly discovered there are more traffic lights, potholes, and low manhole covers in a 2-square-mile area in the east side of town than we have in all of Belknap County in NH! If you want to make a good living, open up a shock-absorber and wheel-alignment shop in Cincinnati.

One of my stops was the church I got married in. I had a few extra days to wander around taking photos of the places that mean lots to me. Once at the church, I was saddened to go up a flight of concrete steps that had horrible rust stains. I shook my head thinking, “What a shame! If only the contractor had taken the time to spray paint the reinforcing steel, there would be no stains.

Oxalic Acid = Magic Rust Remover

My first thought was, "I wish I had some oxalic acid with me. That rust would disappear in minutes." All you have to do is mix the oxalic acid crystals with water, dissolve them, and apply the solution to the rust stains. Scrub and magic will happen. Pay attention to the safety instructions on the label of the oxalic acid! Rinse well with clear water.

Rust Ruins Concrete - Expansion

My second thought was how the rusting steel was expanding. That’s what happens to reinforcing steel when it starts to rust. Within a few years, these wonderful concrete steps that should have lasted seventy years, or more, will be cracked and falling apart.

Have you taken the time to get any bids lately for work? Are you shocked by the prices and how inflation is raging in home building, remodeling, and repair? I know I’m stunned. It’s a good thing I can do just about all repairs to my own home.

Prevent Rust Rather than Replace Concrete

The issue is it’s going to be thousands and thousands of dollars to replace these concrete steps in a few years when they start to fail. The expenditure could have been avoided if the concrete contractor who installed the steps had taken a few extra minutes to roll on or spray on some metal primer and then add a coat of finish paint to the steel rebar.

This is so easy to do and the paint might have cost just $50. The reasons are plenty as to why it wasn’t done. It most likely is the Building Committee members who advise the parish priest just don’t know to do this. If a young architect did plans years ago for the steps, he might not have put in the written specifications telling the contractor to paint the rebar.

I tend to do autopsies on failures like this and then try to share what happens so I can help you avoid the same problem. This is an easy one only from the standpoint that it’s so simple to stop the rust.

You Must Tell Contractor What To Do

What’s the biggest takeaway from this simple rust stain situation? I know you’re not going to like this, but you should be thinking about taking on a more active role in sharing with contractors what you want to be done at your home and more importantly, how it should be done. You may think this is confrontational, but it’s not if you make it clear what you want in the plans and written instructions contractors use to bid your work.

My guess is you’re like most people, including me! You don’t know what you don’t know. And to add to that, you may not know the lexicon of building terms. In some respects, it can be similar to a different language.

Get Specs From Associations

But the Internet has made your job so much easier. You can easily get great advice from a plethora of associations that publish easy-to-understand documents about how products should be installed. The same is true for manufacturers. A smart and wise homeowner selects all the things they intend to use on the job long before the contractors arrive to look at things.

Read Product Installation Instructions

That same homeowner then reads all the installation instructions and notes the really important parts about what needs to be done. Here’s an example. Let’s say you want a few very expensive french doors installed that lead out to a deck. Manufacturers now have very detailed information about how to flash the doors, how to install them, and exactly what needs to be done to make sure they operate like a Swiss watch. Often they have great videos you can watch.

Absorb all this information. Put in your contracts that products must be installed according to the written manufacturer’s instructions. If you’re not able to see the work happen, put it in writing that the contractor has to take photos of important steps before they get covered up. Have him email those photos to you daily.

Technology has made it so very easy to do all of this. Make use of it so your investment doesn’t fall apart like the concrete steps 20 or 30 years before it’s supposed to happen.

Column 1425

The post Concrete Rust Remover – Special Acid – How to Prevent Rust appeared first on Ask the Builder.

You Can Build a New Interior Wall in an Hour

new interior wall

Build a New Interior Wall | This is a new interior wall in an existing home. The angled ceiling makes the job a bit more difficult. Copyright 2021 Tim Carter


Go Ahead, Build a New Interior Wall in an Hour or Less

Do you want to build a new interior wall inside your home? Perhaps you’re trying to create a new small space for a home office, hobby room, or you have a bigger appetite and are transforming a dank basement into a cozy finished living space. But you have no idea where to start. I’ve been there. I’ve experienced your anxiety.

Every now and then, it’s quite interesting to go back in time. I clearly remember having to build my first partition wall inside a house. I was a soaking wet-behind-the-ears carpenter working for a small remodeling company. One of my college professors, Dr. Larsen, had asked me to install a half bathroom in his home. I had no idea what to do so I told him that my boss could do the job.

Once the simple plans were drawn and the contract signed, I was sent to my professor’s house to start the job. I had previously painted the outside of the home three years before and Dr. Larsen and his wife trusted me. Little did they know, I had no clue how to efficiently build the three simple walls needed for the small new bathroom.

I survived with the help of a few phone calls to my boss. It was a humbling experience as I discovered you don’t know what you don’t know. Keep in mind this was decades before the Internet and YouTube. You have no idea how much of an advantage you now have when it comes to all things about how to repair and build things around your home. Count your blessings!

New Construction Walls are Easy

Building a new interior wall in an existing house can be much different than doing it on a new home job site. When we carpenters build a wall for a new home, we typically build it flat on the floor. Once all the studs are nailed to the bottom and top plates, we tilt the wall up and secure it so it doesn’t fall over.

diagonal wall brace

See that angled board nailed to the vertical wall studs? It extends from the top right corner of the wall to the lower-left corner bottom plate. It’s a temporary diagonal wall brace used to stabilize the framing while the house is built. © 2021 Tim Carter Builder

You can’t always do this in an existing home, especially if the ceilings in the room are finished with drywall or plaster. As you tilt the wall up, it binds against the ceiling. If you’re challenged by a finished ceiling, you’ll most likely have to install your top and bottom plates making sure the plates are plumb in the same plane. You’ll then cut each wall stud to fit snugly between the plates and toenail them in place. Drill angled pilot holes in the ends of the wall studs for the nails. Use no less than 3-inch-long 16d sinker nails to connect the wall studs to the plates.

Tilt-Up Wall Between Open Floor Joists

If there is no ceiling, you can tilt the wall up so long as you orient the wall in the same direction as the floor joists above. You simply make sure the top of the wall rises up in between two parallel floor joists. Once the wall is vertical, you can then slide it into position under the floor joists assuming you didn’t make the wall too tall!

Stack Studs on Top of Joists

It’s important for you to consider stacked framing. If your new wall is going to be perpendicular to the way the floor joists below or above run, you should make every attempt possible to layout your wall so the wall studs are located directly above or below the joists. This alignment allows plumbers and HVAC contractors to route their pipes and ducts with ease.

You may discover the carpenters that built your home didn’t go to the trouble to stack all their framing. The floor joists for each floor may not line up. If this is your case, then you need to decide if it’s better to align your new wall studs with the floor joists below or above the wall. This really only comes into play if you have plumbing pipes and heating or air-conditioning ducts in your new wall. Electrical cables are so small and flexible they can easily navigate unstacked framing.

16 Inches on Center

It’s vital that your wall studs are spaced so your drywall ends in the center of a wall stud. Your goal is to minimize cutting thin slivers of drywall off the end of a long piece so you can butt two pieces together. Sixteen inches on center is the gold standard for spacing wall studs.

Correct Door Rough Openings

Don’t fret about how to create the opening for a door. It’s not that hard and you just need to do a little math. My recommendation is to purchase your new prehung door and have it at your home. You’ll create the rough opening in the wall by taking measurements off the door jamb.

Measure the total overall width of the door jamb up at the top where the horizontal door jamb is attached to the two side jambs of the door. Add one-half inch to your measurement. This will be the width of your rough opening. Note how much the side jambs of the door frame hang below the bottom of the door. In almost all cases, you’ll be trimming some of this length off when you install the door. Ideally, you want just one-half inch of space between the bottom of the door and the top of your finished flooring.

You can usually safely make the height of the door rough opening just one-quarter inch longer than the factory length of the door jambs. Trust me, the finished molding you install over the door on top of the drywall will cover even a one-inch gap between the top of the door jamb and the bottom of the rough opening.

If you’re attaching your bottom wall plate to a concrete floor, see how easy it is to secure the plate using just two regular 16d nails!  Watch my video!

Attach Wood To Concrete

The post You Can Build a New Interior Wall in an Hour appeared first on Ask the Builder.

Home Inspectors Near Me – Get Your Own

Building Inspections

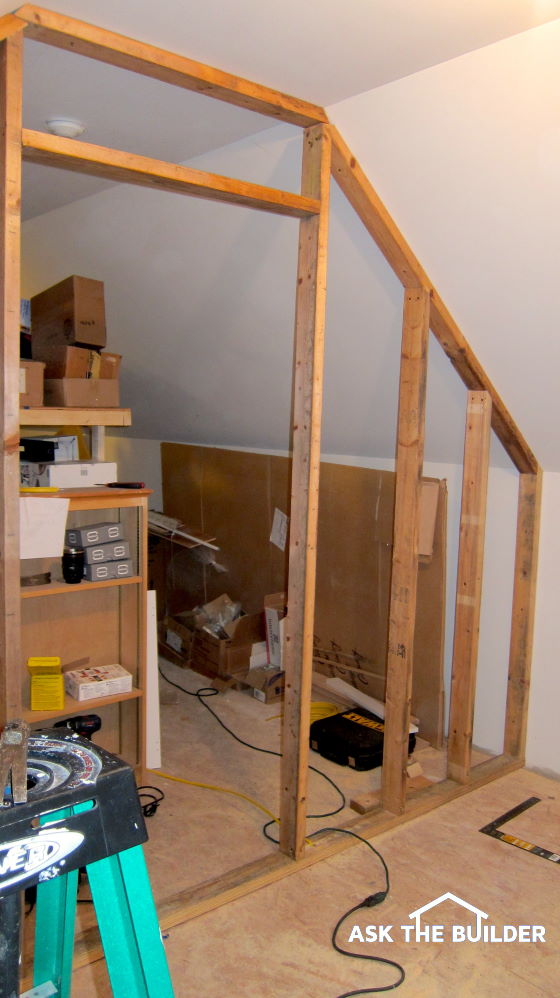
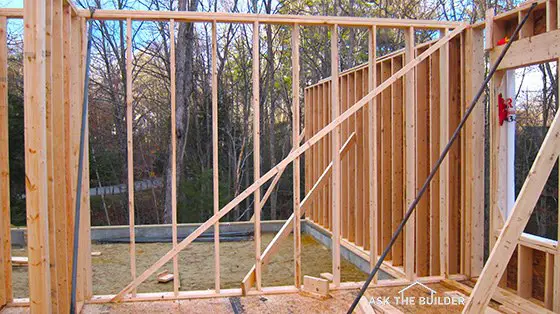
Home Inspectors Near Me - You Have to Hire Ones -Are you sure your new home will be inspected? If not, how would you know if this framing was correct? Copyright 2021 Tim Carter

Home Inspectors Near Me - Structural and ASHI

A few years back, I used to do a two-hour home improvement radio call-in show in Cincinnati, Ohio. It was loads of fun to be on the spot on live radio answering your questions. I miss those mornings, but now I do the same thing via an email interface via my AsktheBuilder.com website.

A few years ago, one of my clients that publishes this column in Kenosha, Wisconsin, invited me onto a live radio show he does each Monday-Friday with his wife on WLIP in Kenosha. Frank and Kim invite me back at least once a month and we cover lots of topics some of which have nothing to do with home improvement. It’s so much fun to be back on live radio!

Several months ago on one show, it came up in a discussion that some places across the USA have no building inspections for new homes. Frank thought this was unbelievable. Last week he brought up this topic again and we spent lots of time discussing it. Frank wanted to know more about home inspectors near me in New Hampshire and other parts of the USA.

Home Inspectors are Not Everywhere

You may think it’s hard to believe too as you might think that building inspections are universal and mandatory. That’s not the case in every city and hamlet across the great fruited plain. For years, I’ve done expert witness work in residential legal cases. I clearly remember a case in northern Ohio where a prominent orthopedic surgeon and his wife built a stunning house on a lake. It turns out there were no inspections required and as you might suspect, problems started cropping up.

You can discover lots more about what goes on in a new home inspection here.

I moved to New Hampshire from Cincinnati in 2008. Not too long after this, I discovered at least one small town in New Hampshire that also has no building inspections. Just a few days ago, a woman hired me to draw her plumbing riser isometric drawing for her new home. I’ve been a master plumber since 1981 and draw many of these plans. It turns out where she’s building in the state of Mississippi, there are no inspections of any type, including a plumbing inspection. This woman asked me, "How can I locate home inspectors near me?"

house foundation with insulated concrete forms

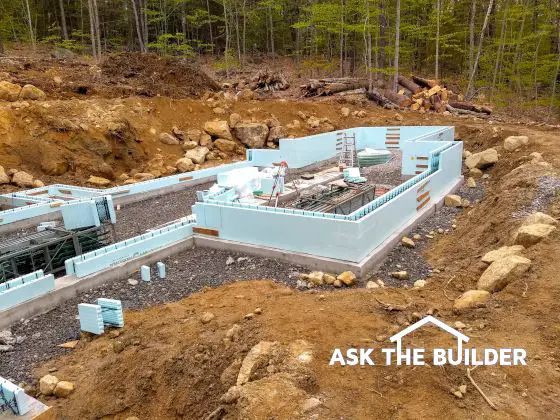
This is a house foundation that’s being built with insulated concrete forms in central New Hampshire. It was done by the homeowner. Who knows if it was inspected? (C) Copyright 2021 Tim Carter

Building Code = Set of Minimum Standards

What does this mean to you? First and foremost, let’s briefly discuss the building code. This written document is generated with the input of many experts. That said, most inspectors I’ve talked with in my 45-plus years in the industry will readily admit the building code is a set of minimum standards. This means if your home passes a building inspection using the code it might be similar to achieving a 70-percent grade on a test. Every aspect of building your home can always be done better than what the code mandates.

You should never assume your home will be inspected, especially if you’re building in a rural setting. It’s in your best interests to call your local government office where building permits are issued and discover what inspections happen as your home is built.

Some new houses get quite a few separate inspections. It’s not unusual in larger towns and cities to have inspectors look at the soil before footings are poured, the framing after all the utilities are installed, the insulation, rough plumbing, rough electric, and final inspections for all these things before a certificate of occupancy is granted.

Inspections Last Minutes Not Hours

However, even with all these inspections don’t think they’re all done with a magnifying glass. Inspectors may only be able to spend a few minutes at your house as they have lots of jobs to look at on that given day. I clearly remember one of my plumbing inspectors that never got out his car to inspect my work. He had seen my work, knew it was first-class, and trusted me. He’d chit chat with me, fill out the sticker, and hand it to me. I’ve had just the opposite with certain electrical inspectors. Some were so thorough they discovered a wall outlet hidden by an open door that had no cover plate!

Hiring Your Own Inspectors

What should you do if you want to ensure your new home is built as best as it can be? This is a whopper of a question. First, it starts with excellent plans and written specifications.

CLICK or TAP HERE to see what a fantastic set of plans looks like. You can DOWNLOAD a PDF copy.

CLICK or TAP HERE to download a sample set of great specifications for a new home.

CLICK or TAP HERE to download a spreadsheet that helps you calculate the cost of your new home.

These two things are the north star for your builder. They should be referenced in your contract with the builder. Simply state that your house must be built in accordance with the plans and specifications that become an exhibit to the contract. You and the contractor should sign the cover page of the plans and specifications as well as the contract. Keep your copy of these documents in a very safe place.

You can hire your own inspectors that can look over the shoulder of the builder. This should be referenced in your contract and there needs to be language that your builder must satisfy this inspector as well as any that your local government provides. If you don’t include this clause in the contract, your builder might say, “I don’t care what he says. That’s not the way I do things.”

It’s entirely possible you might hire separate inspectors for different aspects of the job. I wouldn’t hesitate to hire a residential structural engineer to look at the footings before they’re poured to make sure the soil is good and to make sure the reinforcing steel is correct. I’d have her/him also look at every aspect of the structure as the house is built.

CLICK or TAP HERE to get FREE QUOTES from local Structural Engineers.

You might also look into hiring a home inspector that is certified by the American Society of Home Inspectors (ASHI). If you do this, be sure to ask her/him about how much new construction experience they have. Many of these inspectors have deep experience and that’s the one you want.

Column 1427

The post Home Inspectors Near Me – Get Your Own appeared first on Ask the Builder.

Tuesday, October 26, 2021

Podcast 401: PRO TALK With Mr. Cedar

Follow the Fine Homebuilding Podcast on your favorite app. Subscribe now and don’t miss an episode: The Fine Homebuilding podcast is recording a second weekly podcast focusing on the issues […]

The post Podcast 401: PRO TALK With Mr. Cedar appeared first on Fine Homebuilding.

A Sustainable Alternative to Wood

Modern builders are constantly looking for sustainable, ecofriendly, and durable choices when it comes to building materials, particularly when it comes to home parts that have traditionally been made of […]

The post A Sustainable Alternative to Wood appeared first on Fine Homebuilding.